AVO® 215 CAT III TRMS multimeter User GuideRegister megger.com/registerUser Guide Support megger.com/supportENEnglish
This document is copyright of:Megger Limited, Archcliffe Road, Dover, Kent CT17 9EN. ENGLAND T +44 (0)1304 502101 F +44 (0)1304 207342 www.megger.comMegger Limited reserves the right to alter the specification of its products from time to time without notice. Although every effort is made to ensure the accuracy of the information contained within this document it is not warranted or represented by Megger Limited to be a complete and up - to - date description.For Patent information about this instrument refer to the following web site: megger.com/patentswww.megger.com2AVO® 215
Declaration of ConformityHereby, Megger Instruments Limited declares that radio equipment manufactured by Megger Instruments Limited described in this user guide is in compliance with Directive 2014/53/EU. Other equipment manufactured by Megger Instruments Limited described in this user guide is in compliance with Directives 2014/30/EU and 2014/35/EU where they apply.The full text of Megger Instruments EU declarations of conformity are available at the following internet address: megger.com/company/about-us/eu-dofc This manual supersedes all previous issues of this manual. Please ensure that you are using the most recent issue of this document. Destroy any copies that are of an older issue.www.megger.com3AVO® 215
www.megger.com4IntroductionAVO® 2151. IntroductionThank you for purchasing an AVO® digital multi-meter from Megger®. This user guide details the specifications, functional aspects and how to use the Megger digital multi-meter model No. AVO®215.For your own safety and to get the maximum benefit from this Megger instrument, read and understand the safety warnings and instructions before the instrument is used.Megger reserves the right to improve the content of this user guide from time to time without notice. Megger reserves and retains the intellectual property rights of the content including the design, text, graphics, and logos in this user guide. Any partial or complete reproduction or usage of the content is strictly prohibited.1.1 Company web siteOccasionally an information bulletin may be issued via the Megger web site. This may concern new accessories, new usage instructions or a software update. Please occasionally check on the Megger web site for anything applicable to your Megger instruments.www.megger.com
www.megger.com5Safety Warnings and StandardsAVO® 2152. Safety Warnings and StandardsThese safety warnings must be read and understood before the instrument is used. Retain for future reference.2.1 Warnings, Cautions and NotesThis user guide follows the internationally recognised definition. These instructions must be adhered to at all times. DescriptionWARNING : Indicates a potentially dangerous situation which, if ignored, could lead to death, serious injury or health problems. CAUTION : Indicates a situation which could lead to damage of the equipment or environmentNOTE : Indicates important instructions to be followed to perform the relevant process safely and efficiently.2.2 Safety warnings Users of this instrument and their employers must do a valid risk assessment of all electrical work to identify potential sources of electrical danger and risk of electrical injury and must conform to national safety legislation. Where assessment shows significant risk from high energy systems, the use of fused leads must be considered. If the instrument is used in a manner not specified by the manufacturer, the protection provided by the instrument may be impaired. The instrument must not be used if any part of it is damaged. Use only Megger approved test leads and accessories with this instrument. Test leads and probes must be in good order, clean and have no broken or cracked insulation. Hold the test probes behind the finger-guards when they are in contact. Always check that the correct instrument connections and range selection have been made before connection to the test subject. Voltage or current that exceeds the instrument ratings can damage the instrument and present a shock or fire hazard. Use caution when working with voltages above 30 V AC rms, 42 V AC peak or 60 V DC. These voltages present a shock hazard. To avoid the risk of electric shock do not connect the thermocouple to circuits greater than 10 V. Before any resistance, continuity, diode, or capacitance measurements are started, circuits must be de-energised and isolated from the mains power. Before and after use always test a known voltage to check for correct instrument operation. Do not use the instrument if incorrect results are obtained. Make sure that the test probes are disconnected before the case or battery cover is opened. Replacement fuses must be of the correct type and rating. The instrument must not be used in wet conditions. If it should become wet, it must be dried thoroughly before use.
www.megger.com6Safety Warnings and StandardsAVO® 215 Test leads, which are used for mains measurements, must be rated as appropriate for measurement Category III. They must also have a voltage rating of at least the voltage of the circuit to be measured.2.2.1 Installation category definitions:CAT IV - Measurement category IV: Equipment connected between the origin of the low-voltage mains supply and distribution panel.CAT III -Measurement category III: Equipment connected between the distribution panel and electrical outlets.CAT II - Measurement category II: Equipment connected between the electrical outlets and user’s equipment.Measurement equipment may be safely connected to circuits at the marked rating or lower. The connection rating is that of the lowest rated component in the measurement circuit.2.3 Safety, Hazard and Warning symbols on the instrumentThis paragraph details the various safety and hazard icons on the instrument’s outer case.Icon DescriptionFRisk of electric shockGSee instruction manualBoth direct and alternating currentaAC voltsdDC voltsHz%Frequency and Percentage of duty cycleCAP Resistance, Diode, Continuity, Capacitance selection FlashlighttEquipment protected by double or reinforced insulationUK conformity. This equipment complies with current UK legislationEU conformity. Equipment complies with current EU directives Do not discard this product or throw away
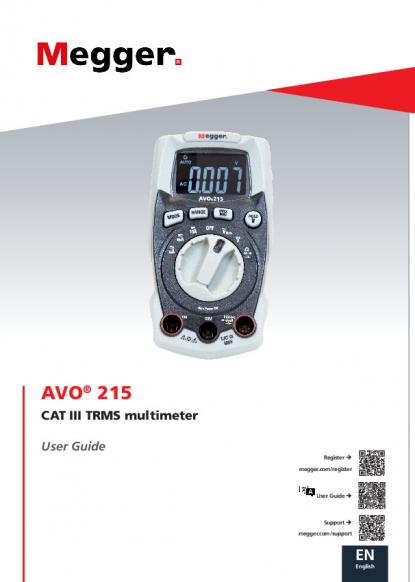
www.megger.com7Instrument OverviewAVO® 2153. Instrument Overview3.1 Features 4000 count display CAT III 600 V AC / DC voltage 600 V max AC / DC current 10 A max True RMS Resistance 40 MΩ Capacitance 4000 μF max Frequency 10 kHz max Duty cycle 99.9 % Data hold Auto power off Auto ranging Back light display Built in flashlight Max/Min Rear tilt stand3.2 Instrument layout14563287910ItemDescriptionItemDescription1.Battery cover (rear)6.HOLD and flashlight button2.4000 count LCD display7.Function switch3.RANGE button8.COM 4 mm socket4.MAX/MIN button9.10 A input 4 mm socket5.MODE button (VAC / Hz / Duty cycle)10.V, Ω, Hz%, Diode, mA, μF input 4 mm socket
www.megger.com8Instrument OverviewAVO® 2153.3 Display symbolsItemDescriptionItemDescription Auto power offMMega (ohms) ContinuityΩOhms Diode testHzHertz (frequency)Battery statusVVoltsnnano (capacitance)%Percent (duty cycle)μmicro (amps, capacitance)ACAC currentmmilli (volts, amps)AUTOAutorangingAAmpsDCDC currentkkilo (ohms)HOLDDisplay holdFFarads (capacitance)MAXMaximumMINMinimum
www.megger.com9Operation AVO® 2154. Operation NOTE : Turn the function switch to OFF position when the meter is not in use.If ‘OL’ appears on display during a measurement, the value exceeds the range you have selected. Change to a higher range.4.1 DC Voltage measurements G Avoid measuring DC voltages if a motor on the circuit is being energised /de-energised. Large voltage surges may occur that can damage the meter.1. Set the function switch to VDC position.2. Insert the black test lead plug into the COM socket. Insert the red test lead plug into the V socket.3. Apply the black test probe to the negative side of circuit being tested. Apply the red test probe to the positive side of circuit being tested.4. Read the displayed voltage.5. If necessary, adjust range.4.2 AC Voltage (Frequency, Duty Cycle) measurements G Avoid measuring AC voltages if a motor on the circuit is being energised/de-energised. Large voltage surges may occur that can damage the meter.1. Set the function switch to VAC / Hz / % position.2. Insert the black test lead plug into the COM socket. Insert the red test lead plug into the V socket.3. Apply the black test probe to the Neutral side of circuit being tested. Apply the red test probe to the Live side of circuit being tested.4. Read the displayed voltage.5. If necessary, adjust range if required.6. For frequency measurements press the MODE button to indicate Hz on display. 7. Read the displayed frequency.8. For Duty Cycle press the MODE button to indicate % on display. Read the displayed % of duty cycle.
www.megger.com10Operation AVO® 215NOTE : Duty Cycle is a ratio of time that a circuit is energised compared to the time the circuit is de-energised. Typical circuit would be a heater element controlled by a thermostat.Duty cycle is measured in percentage of ON time. Example: A 75% duty cycle is a signal that is on 75% of the time and off 25% of the time.A complete ON / OFF cycle is generally called a period.4.3 DC Current measurements G Do not make 20 A current measurements for longer than 30 seconds.Exceeding 30 seconds may cause damage to the meter and /or test leads.1. Insert the black test lead plug into the negative COM socket.2. For current measurements up to 6000 μA DC, set the function switch to the μA position and insert the red test lead plug into the μA / mA socket. For current measurements up to 600 mA DC, set the function switch to the mA position and insert the red test lead plug into the μA / mA socket. For current measurements up to 20 A DC set the function switch to the 10 A position and insert the red test plug into the 10 A socket.3. Press the MODE button to indicate DC on the display.4. Remove power from the circuit under test, then open up the circuit at the point where the measurement is to be made.5. Apply the black test probe to the negative side of circuit.6. Apply the red test probe to the positive side of circuit.7. Apply power to circuit.8. Read the displayed current.
www.megger.com11Operation AVO® 2154.4 AC Current measurements G Do not make 20 A current measurements for longer than 30 seconds.Exceeding 30 seconds may cause damage to the meter and /or test leads.1. Insert the black test lead plug into the negative COM socket.2. For current measurements up to 6000 μA AC, set the function switch to the μA position and insert the red test lead plug into the μA / mA socket. For current measurements up to 600 mA AC, set the function switch to the mA position and insert the red test lead plug into the μA / mA socket. For current measurements up to 20 A AC set the function switch to the 10 A position and insert the red test plug into the 10 A socket.3. Press the MODE button to indicate AC on the display.4. Remove power from the circuit under test, then open up the circuit at the point where the measurement is to be made.5. Apply the black test probe and red test probe to either side of where the circuit has been opened.6. Apply power to circuit.7. Read the displayed current.4.5 Resistance measurements F To avoid electric shock, disconnect power to circuit under test and discharge all capacitors before taking any resistance measurements.1. Set the function switch to the CAP position.2. Insert the black test lead plug into the negative COM socket.3. Insert the red test lead plug into the positive socket.4. Repeatedly press the MODE button until is indicated on the display.5. Connect the test lead probes across circuit or part under test. (It is recommended to disconnect one side of the part under test, so the rest of the circuit does not interfere with the resistance measurement).6. Read the displayed resistance.
www.megger.com12Operation AVO® 2154.6 Continuity check F To avoid electric shock, never measure continuity on circuits that have voltage on them.1. Set the function switch to the CAP position.2. Insert the black test lead plug into the negative COM socket.3. Insert the red test lead plug into the positive socket.4. Repeatedly press the MODE button until and are indicated on the display.5. Connect the test lead probes to the circuit under test. 6. If the resistance is less than 50 Ω, the audible signal will sound.7. If the circuit is open, OL will be displayed.4.7 Diode test1. Set the function switch to the CAP position.2. Insert the black test lead plug into the negative COM socket.3. Insert the red test lead plug into the positive V socket.4. Repeatedly press the MODE button until and V are indicated on the display.5. Connect the test lead probes to the diode under test. 6. Forward voltage will typically indicate 0.400 to 0.700 V. Reverse voltage will indicate OL.7. Shorted diodes will indicate nearly 0 V while an open circuit diode will indicate OL with both polarities.4.8 Capacitance measurements F To avoid electric shock, disconnect power to circuit under test and discharge all capacitors before taking any capacitance measurements.1. Set the function switch to the CAP position.2. Insert the black test lead plug into the negative COM socket.3. Insert the red test lead plug into the positive V socket.4. Repeatedly press the MODE button until nF is indicated on the display.
www.megger.com13Operation AVO® 2155. Connect the test lead probes to the capacitor under test. 6. The test may take up to 3 minutes or more for large value capacitors to charge. Wait until the readings to settle.7. Read the displayed capacitance.4.9 Auto ranging / Manual range selection The AVO®215 automatically enters auto ranging mode when first switched on. This automatically selects the best range for measurements. For measurements that require the range to be manually selected, the following procedure should be followed:1. Press the RANGE button. The AUTO display indicator will turn off.2. Repeatedly press the RANGE button to step through the available ranges until the required range is reached.3. To exit manual ranging and return to auto ranging, press and hold the RANGE button for 2 seconds.NOTE : Manual ranging does not apply for capacitance and frequency measurements.4.10 MAX/MINNOTE : When using the MAX/MIN function in Auto ranging mode, the meter will lock into the range that is displayed on the LCD when MAX/MIN is activated. If a MAX/MIN reading exceeds that range, OL will be displayed. Select the desired range BEFORE entering MAX/MIN mode.1. Press the MAX/MIN button to activate the MAX/MIN recoding mode. The display will show MAX. The meter will display and hold the maximum reading, updating only when a new maximum occurs.2. Press the MAX/MIN button again. The display will show MIN. The meter will display and hold the minimum reading, updating only when a new minimum occurs.3. To exit MAX/MIN mode press and hold the MAX/MIN button for 2 seconds. 4.11 Display back lightPositive display and back light activate when the meter is turned on.
www.megger.com14Operation AVO® 2154.12 MODEThe MODE button is active only in the selection switch CAP position to allow selection of the diode, continuity, resistance and capacitance tests, and in the μA, mA and 10 A positions to select between AC or DC measurements.4.13 HOLD / flashlightThe hold function freezes the reading on the display. Press the HOLD button momentarily to activate or de-activate the hold function.To activate or de-activate the flashlight select any function switch position and press the HOLD button for >1 second.4.14 Auto Power Off The auto power off feature will turn the meter off after 15 minutes. To disable the auto power off, hold down the MODE button and switch meter on.4.15 Low Battery IndicationThe symbol will appear in the lower left corner of the display when the battery voltage becomes low. The battery must be replaced as soon as this symbol appears to avoid incorrect/inaccurate readings.
www.megger.com15Maintenance. AVO® 2155. Maintenance. NOTE : There are no user replaceable parts within this product, other than the battery cells and the fuses. 5.1 General maintenanceDo not attempt to repair this multimeter. It contains no user-serviceable parts. Repair or servicing should only be performed by qualified personnel. 5.2 CleaningPeriodically wipe the case with a dry cloth and detergent, do not use abrasives or solvents.
www.megger.com16SpecificationsAVO® 2156. SpecificationsDC Voltage RangeResolutionAccuracy400 mV0.1 mV+/- (1.0 % reading + 5 digits)4 V0.001 V+/- (1.0 % reading + 3 digits)40 V0.01 V400 V0.1 V600 V1 VAC Voltage RangeResolutionAccuracy4 V0.001 V50 Hz to 60 Hz+/- (1.2 % reading + 3 digits)40 V0.01 V400 V0.1 V600 V1 VAll AC voltage ranges are specified from 5 % of range to 100 % of rangeDC Current RangeResolutionAccuracy400 μA0.1 μA+/- (1.0 % reading + 3 digits4000 μA1 μA+/- (1.2 % reading + 3 digits)40 mA0.01 mA400 mA0.1 mA4 A0.001 A10 A0.01 A(20 A: 30 seconds maximum with reduced accuracy)AC Current RangeResolutionAccuracy400 μA0.1 μA+/- (1.2 % reading + 3 digits)4000 μA1 μA40 mA0.01 mA400 mA0.1 mA4 A0.001 mA+/- (1.8 % reading + 5 digits)10 A0.01 A(20 A: 30 seconds maximum with reduced accuracy) All AC current ranges are specified from 5 % of range to 100 % of range
www.megger.com17SpecificationsAVO® 215Resistance RangeResolutionAccuracy400 Ω0.1 kΩ+/- (1.5 % reading + 5 digits)4 kΩ0.001 kΩ40 kΩ0.01 kΩ400 kΩ0.1 kΩ4 MΩ0.001 MΩ40 MΩ0.01 MΩ+/- (2.5 % reading + 20 digits)Capacitance RangeResolutionAccuracy40 nF0.01 nF+/- (4.5 % reading + 10 digits)400 nF0.1 nF4 μF0,001 μF+/- (3.0 % reading + 5 digits)40 μF0.01 μF400 μF0.1 μF4000 μF1 μF+/- (5 % reading + 5 digits)Frequency RangeResolutionAccuracy10 Hz – 10 kHz0.01 Hz+/- (1.2 % reading)Sensitivity: 15 V rmsDuty Cycle RangeResolutionAccuracy0.1 to 99.9 %0.1 %+/- (1.2 % reading + 2 digits)Pulse width: 100 μs – 100 ms, Frequency: 5 Hz to 150 kHzNOTE : Accuracy is stated at 18 °C to 28 °C (65 °F to 83 °F) and less than 75 % RH. NOTE : Accuracy specifications consist of two elements. (% reading) = accuracy of the measurement circuit. (+ digits ) = accuracy of analog to digital converter.Drop test: 6.5 feet (2 metres)Diode test: Test current of 1.5 mA maximum, open circuit voltage 3 V DC typicalContinuity check: Audible signal will sound if the resistance is less than 50 Ω (approx.), test current <0.35 mA
www.megger.com18SpecificationsAVO® 215Input impedance: >10 MΩ VDC / VACAC response: TRMSACV bandwidth: 50/60 Hz (All waveforms) 45 Hz to 1000 Hz (Sine wave)Crest factor: Less than or equal to 3 at full scale up to 300 V, decreasing linearly to less than or equal to 1.5 at 600 VAuto power off: 15 minutes - can be disabled Display: 4000 counts / positive displayOverrange indication: ‘OL’ is displayedPolarity: Automatic (No indication for positive) Minus symbol for negativeMeasurement rate: 3 times per secondBattery: 1.5 V AAA x 2 batteriesFuses: mA / μA ranges: 0.5 A 600 V ceramic quick blow fuse A range: 10 A 600 V ceramic quick blow fuseOperating temperature: 5 °C to 40 °C (41 °F to 104 °F )Storage temperature: -20 °C to 60 °C (-4 °F to 140 °F )Operating humidity: Max 80 % up to 31 °C (87 °F) decreasing linearly to 50 % at 40 °C (104 °F )Storage humidity: <80 %Operating altitude: 2000 metres (7000 feet) maximumWeight: 342 g (0.753 lb)Size: 182 x 82 x 59 mmIEC IEC61010Safety rating: CAT III 600 V
www.megger.com19DecommissioningAVO® 2157. Decommissioning7.1 WEEE DirectiveThe crossed out wheeled bin symbol on the instrument and on the batteries is a reminder not to dispose of them with general waste at the end of their life.Megger is registered in the UK as a Producer of Electrical and Electronic equipment. The registration No is; WEE/DJ2235XR. Users of Megger products in the UK may dispose of them at the end of their useful life by contacting B2B Compliance at www.b2bcompliance.org.uk or by telephone on 01691 676124.Users of Megger products in other regions should contact their local Megger office or distributor.7.2 Battery disposalThe batteries in this product are classified as Portable Batteries under the Batteries Directive. Please contact either Megger Ltd, your local Megger office or distributor for instructions on the safe disposal of these batteries.Megger is registered in the UK as a producer of batteries. The registration number is BPRN01235.For further information see www.megger.com
Megger LimitedArchcliffe Road DoverKent CT17 9EN ENGLAND T. +44 (0)1 304 502101 F. +44 (0)1 304 207342Megger GmbHWeststraße 5952074 AachenT. +49 (0) 241 91380 500E. info@megger.deMegger Valley Forge400 Opportunity WayPhoenixville, PA 19460USAT. +1 610 676 8500 F. +1 610 676 8610Megger LimitedArchcliffe Road DoverKent CT17 9EN ENGLAND T. +44 (0)1 304 502101 F. +44 (0)1 304 207342Megger USA - Dallas4545 West Davis StreetDallas TX 75237USAT. 800 723 2861 (USA only)T. +1 214 333 3201F. +1 214 331 7399E. USsales@megger.comMegger AB Rinkebyvägen 19, Box 724, SE-182 17 DANDERYDT. +46 08 510 195 00E. seinfo@megger.comMegger USA - Fort Collins4812 McMurry AvenueSuite 100Fort Collins CO 80525USAT. +1 970 282 1200Manufacturing sitesLocal Sales officeThis instrument is manufactured in China.The company reserves the right to change the specification or design without prior notice.Megger is a registered trademarkThe Bluetooth® word mark and logos are registered trademarks owned by Bluetooth SIG, Inc and is used under licence.AVO215_UG_en_V02 02 2024 © Megger Limited 2023 www.megger.com